Support - Vilkas Now
- Now »
- Basic settings »
- Quick Start Guide
Are you looking for Vilkas Suite support?
Vilkas Suite supportQuick Start Guide
Contents
1. Overview of the administration area
2. Choosing your theme
3. Editing pages
4. Categories
5. Products
6. Payment methods
7. Delivery methods
8. Managing orders
9. App Store
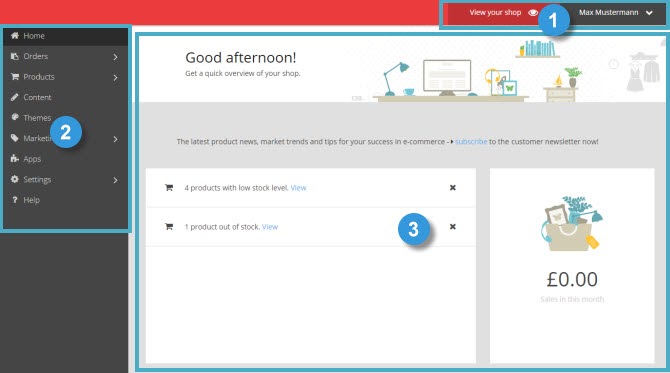
You are managing your shop in the administration area. There you can edit the content of your shop, add products, manage orders and much more.
-
Select View your shop and your shop will open in a new browser window. This will allow you to immediately check any changes you have made.
-
What would you like to do next? You can use the main menu to switch between individual pages of the administration area.
-
The working area occupies the most space within the administration area. This is where the majority of the work for your shop is carried out. Depending on which page you have called up, you might find forms or charts that you can use to manage your shop.
In the administration area, you may occasionally see this information symbol: Hover your cursor over the information symbol at any point to view a short help text about the associated field.

In the administration area, you may occasionally see this information symbol. Hover your cursor over the information symbol at any point to view a short help text about the associated field.
The underlying design of your shop is based on a design template or “theme”.
Each theme offers certain design elements– such as the fonts used or the way in which content is arranged. The theme also defines which elements of your shop can and cannot be edited.
In addition, each theme provides you with a number of styles to choose from. These differ in the color palette used, for example.
You can switch to a different theme at any time and thereby give your shop a new appearance.
You can also customize your theme and for instance change its colors. For more information, read Customizations for your theme.
It is easy to manage and edit pages of your online shop. Absolutely no programming skills are required to do this.
To make the changes, you simply use the editor that is opening when you select Editor in the main menu in your shop's administration area.
The pages of your shop
Your shop is composed of a number of pages. These include:
Page
Description
Symbol
Home
On the home page, you provide an overview of your shop and of the products you are selling. The home page is what visitors see when they simply type in your domain. An example would be www.youronlineshop.com.

Category pages
Category pages are used for displaying products in a particular category. In a fashion shop, for example, possible categories might be “Jackets” and “Trousers”.

Content pages
On content pages, you can provide your visitors with further information. As an example, you can use an “About us” page to give more details of your company.

Legal pages
It may be obligatory to include legal pages to comply with the law. On them, you can supply your visitors with important information regarding issues such as data protection or their right of withdrawal. On pages of this type only text can be edited. No other elements such as images or videos can be added. You can find more information on legal pages in the article Tips for legal pages.

Product pages
Your product pages are automatically created when you add a product. You can edit the texts and the pictures for products by selecting the product under Products >> View products. You are not able to drag and drop content elements on those pages.
The different areas of your shop
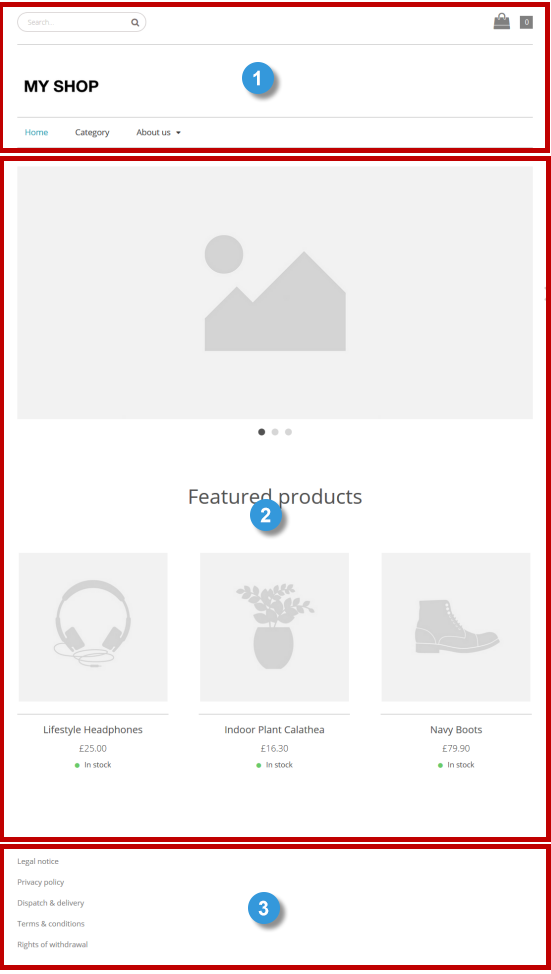
Each page (with the exception of your shop's checkout) consists of three areas:
-
Header - The header contains elements like the logo of your shop, the main menu and the search bar. It helps visitors to find their way – or navigate – around your shop.
-
Content area - Depending on the page concerned, the content area might contain texts, images, videos and/or products.
-
Footer - The footer contains links to the legal pages of your shop, such as the legal notice page or your terms and conditions. Depending on the theme of your shop, it is also where social media icons may be displayed with links to your Facebook or Twitter page and other accounts. For more information read the article Links to social networks in the footer (Facebook, Twitter etc.).
How the editor works
You use the editor to manage your pages and your content.
Start the editor by selecting Editor in the main menu within the administration area of your shop.
In the editor, you can make the following changes depending on the type of page:
-
Add elements (such as text, images or videos)
-
Edit and format elements
-
Move elements
-
Delete elements
You can read more about this in the article Editing the content of a page.
In addition, the editor provides you with ways of doing the following:
Product pages cannot be edited using the editor. For more information, see Managing products.
What is the structure of the editor?
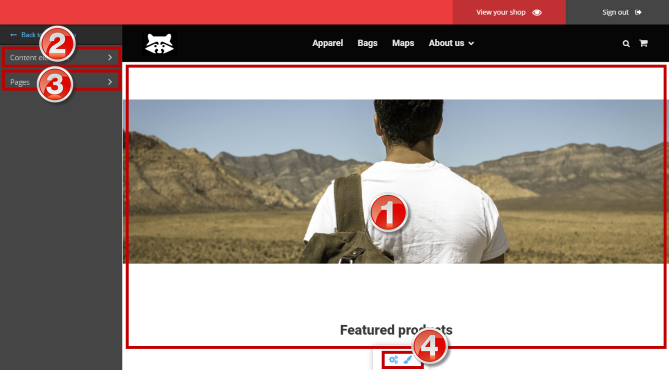
The editor consists of various areas.
-
Your shop - On the right, you can see the currently selected page of your shop. This is where you can modify any editable elements. Note that any changes will be immediately visible in your shop.
-
Content elements - Under Content elements in the sidebar you will find various elements that you can simply “drag and drop” into your shop to the right. If, for instance, you would like to add an image to a particular page, you can simply drag that element to the required location on the page by holding the left mouse button down. In your shop to the right, you can see the locations where you can drop the element marked in blue. For more information read the article Editing the content of a page.
-
Pages - To the left, in the sidebar below the Content elements area, you can find the Pages. This is where you can select which page you would like to edit in your shop to the right and also adjust the general settings for particular pages. You can also create new content pages here. For more information read the article Editing the content of a page.
-
Customizations - Here you can make further customizations to your shop, depending on the theme you selected. For instance you may adapt the colors of your shop or add social media links to the footer. For more information read the article Customizations for your theme.
You can assign the products of your shop to categories – for instance „Jackets“ or „Backpacks“. Every product of your shop has to be assigned to at least one category. Categories that are set to visible are displayed as menu items in the main menu of your shop.
To manage the categories of your shop, select in your shop’s administration area in the main menu Products and then Manage categories.
Creating a new category
1. In your shop's administration area in the main menu, select Products and then Manage categories.
2. In the table, you can see all the categories of your shop. Select + Add.
3. Enter the name of the new category.
4. Select Add.
5. The new category has been created. Select the name of the category in the table to edit it.
6. Here you can edit the settings of the category:
-
Category name: The name of the category is used in your shop’s main menu for instance.
-
Visible in shop: Invisible categories are not shown in your shop’s menu. They can still be visited if the customer knows their address or if they are accessed via a search engine like Google.
7. Save the changes.
8. Would you like to assign products to the category immediately? Then select Products and continue with the following steps.
9. Select + Assign products.
10. Select the products in the table.
11. Select Apply.
In the administration area in the main menu, select Products and then View products. The table shows an overview of all products in your online shop. To edit one of the products, select its product number in the table.
Adding a product
Every product of your shop has to be assigned to at least one category. Otherwise it is not visible in your shop. If you do not have created any categories yet, please do so first. You can read more on this topic in the article Managing categories.
In the administration area in the main menu, select Products and then View products. Select the button + Add to add a new product. On the following page you can edit all of the information concerning this product. You do not need to fill out all of the fields. Save your changes at the end.
You can offer your customers various payment methods. They can be divided into two types:
-
Usual payment methods like payment in advance, invoice or direct debit where you handle the billing.
-
Payment through a third-party provider, like PayPal, which handles the entire payment process on your behalf and then passes the money on to you. You have to register with the payment provider first before you can set up that payment method in your shop.
How to create a new payment method with a payment provider like PayPal
1. In the administration area in the main menu, select Settings and then Payments.
2. In the table at the bottom of the page you can see all the payment methods already created in your shop. At the top of the page under “Add payment method”, select the kind of payment method you want to add.
3. On this page you can find information on this payment method. Select Add to add a payment method to your shop.
4. Follow the instructions displayed on the page to set up this payment method.
5. Save the changes. The payment method is now created, but it is not available to your customers yet. You now need to edit it. Continue with step 3 of the section How to edit a payment method below.
How to create a new standard payment method like invoice or payment in advance
1. In the administration area in the main menu, select Settings and then Payments.
2. In the table at the bottom of the page you can see all the payment methods already created in your shop. As you can see, some payment methods are already pre-set and all you need to do is adjust and enable them. If the payment method you require is already in the table, please skip to step 2 of the section How to edit a payment method below.
If the payment method you require is not there, go to the top of the page. Under “Add payment method”, select Standard. Maybe you need to select Show all to see all available options.
3. Select Add for the payment method you would like to add.
4. Continue with step 3 of the next section How to edit a payment method.
How to edit a payment method
1. In the administration area in the main menu, select Settings and then Payments.
2. In the table at the bottom you can see all the payment methods already created in your shop. Select the name of the payment method you want to edit.
3. On the page General you make the general settings for the payment method. Please note that there are various options available depending on the payment method.
Option
Description
Internal ID
This internal name for the payment method is not displayed anywhere to your customers.
Type
The type indicates the kind of payment method. It cannot be altered once the payment method has been created.
Visible in shop
This is where you determine whether the payment method is available or not to your customers in the shop. Leave this option set to No until the payment method has been fully set up.
Default selection
Specify whether this should be the standard payment method for your shop.
Minimum / maximum order value
Here you can determine whether there needs to be a minimum and/or maximum order value for this payment method. If a customer order does not meet the minimum order value and/or exceeds the maximum order value, the customer will not be offered this payment method.
Discount or fee
Specify if customers get a discount or have to pay a fee for ordering using this method. Then you can determine the value of the discount or fee.
Region
If this feature is available in your shop, you can specify that only customers from a specific region can use this payment method. Please note that this option is only displayed if you have already set up at least one region for your shop. For more information, read Regions.
Name in shop
The payment method is displayed in the shop with this name.
Description
Here you can enter further information about this payment method for your customers. This information will be displayed to your customers during the order process when payment methods are selected. It will also appear on the order documents.
Display logo
Determine if a logo for this payment method should be displayed in the order process. In this case, upload an image of the logo and select beforehand if the image size should be changed during upload. Some payment methods already have a default logo.
4. Save the changes.
5. Select Settings. Note: For some payment methods you do not need to edit any settings and there is no Settings page for them. If you process this kind of payment method, please skip to step 8.
6. On this page you make additional settings for this payment method. If it is a payment method with a third-party provider (for example PayPal), you can find instructions at the top of the page with the additional steps needed to set up this method. Please follow these instructions, make all the additional settings on this page and save the changes.
7. Select General.
8. For Visible in shop select the option Yes.
9. Save the changes.
The payment method is now available in the shop for your customers. You should always test payment methods with third-party providers.
You can create different delivery methods in your shop. Delivery methods can be optionally linked to a logistics provider. You can also set the delivery method to be available only for certain products.
How to create a new delivery method
1. In the administration area in the main menu, select Settings and then Delivery.

2. In the table you can see all the delivery methods already created in your shop. Select the button + Add.

3. If you do not wish to link your new delivery method to a logistics provider, under Logistics vendors select the option User-defined delivery method. Otherwise, select the desired provider from the list. Linking to a logistics provider for instance has the advantage of enabling you to create franked shipping labels.
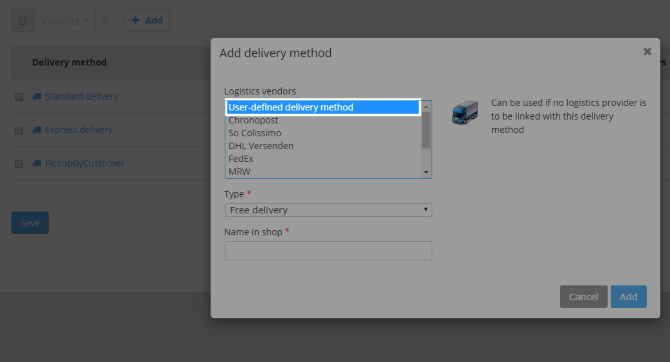
4. Under Type, determine how the delivery costs are to be calculated for this delivery method. Select a type to see a short explanation about it on the right side. More information can be found here.
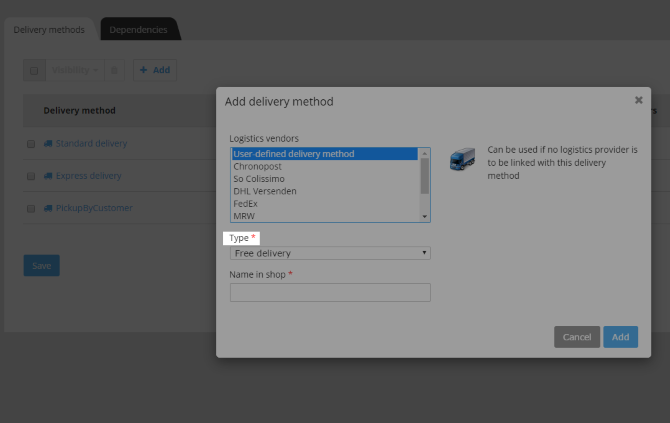
5. Under Name in shop, enter a name for the delivery method, which will then be displayed later on in your shop. No two delivery methods can share the same name.
6. Select Add.
7. If you have linked the delivery method in step 3 to a logistics provider, select the Complete button, follow the steps as specified and save the changes.
8. Select Settings.

9. On this page, you can now define the settings for this delivery method and save the changes. More information can be found here. One exception are delivery methods of the Free delivery type: This step is unnecessary for these delivery methods because there are no delivery costs incurred.
10. Select General.
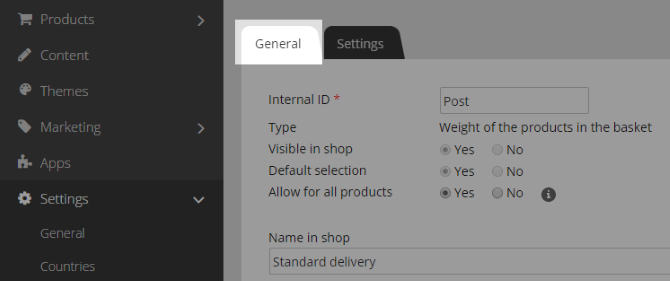
11. Make the general settings for this delivery method here. Depending on the delivery method, the settings can include the following ones.
Option
Description
Internal ID
This internal name for the delivery method is not displayed anywhere to your customers.
Type
The type specifies how the delivery costs are calculated for this delivery method. It cannot be altered once the delivery method has been created.
Visible in shop
This is where you determine if the delivery method is available to your customers in the shop. Leave this option set to No until the delivery method has been fully set up.
Default selection
Specify if this should be the standard delivery method for your shop.
Allow for all products
Determine if this delivery method can be used for all products or only for specific ones.
Region
If this feature is available in your shop, you can specify that only customers from a specific region can use this delivery method. For more information, read the article Regions.
Name in shop
The name of the delivery method in your shop.
Description
Here you can enter further information about this delivery method. For instance, this information will be displayed to your customers during the order process when delivery methods are selected.
Logo
Determine if a logo for this delivery method should be displayed in the order process. In this case, upload an image of the logo and select beforehand, if the image size should be changed during upload. Some delivery methods already have a default logo.
12. Save the changes.
After you have set up, launched and publicised your shop, it won't be long before the first orders come in.
The menu item Orders is the central place for processing orders.
Under the View orders menu item, you will find all orders.
To view the details of an order, click on the Order no.
Use the Status option to constantly keep track of an order's status. You can find more information on this in the article Order status.
On the Documents subpage, you can generate an invoice or a packing slip in just a few clicks.
Use the search function to find specific orders quickly.
In the App Store you can find a variety of apps which help you boosting your business. Please note that the availability of apps depends on the shop package you booked at your provider.
The apps help you with these aspects of your online shop:
-
Shipping
-
Marketing & Sales
-
Accounting & Reporting
-
Content & Design
-
Inventory Management
-
Social Media
-
Statistics
-
Customer Service
How to use the App Store
In the administration area in the main menu, select Apps.
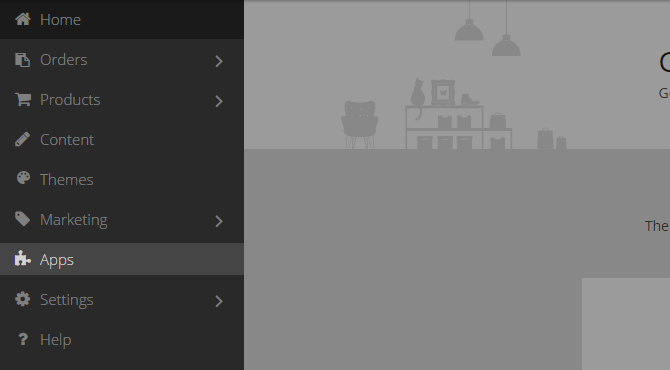
Here you can find all available apps.
Select one of the apps to get more information.
To use one of the apps, select the button Open or Install app.